


If anyone who reads this blog regularly figured that I did not post yesterday due to laziness or lack of enthusiasm, you are terribly mistaken. I actually spent the whole day making the dough for croissants. Yes, this little layered pastry goddess takes a lot of time to create, but do trust me when I say, it was all totally worth it! This recipe is fool proof and it makes the flakiest, buttery, golden, puffy croissants ever! I wish my parents could have shared them with me. My Amma loves croissants and she always tells me about how much she enjoys eating these gold, crunchy and fluffy works of art. She would tell me how she wishes to go to Paris again, just to eat all the baguettes and croissants. Well, today I missed both Amma and Acha the most, since I baked up their favourite breakfast pastry. Croissants are so versatile, you can have them with eggs and bacon, or with jam. You can even make a great bread pudding out of them. I absolutely love them and today was probably my happiest baking day. I think I have made my parents proud. But like I said, wish they could taste them instead of staring at pictures.

Ingredients:
Dough block:
- 1/2 cup warm whole milk
- 1 tsp plus 1 tbsp of sugar
- 4 tbsp of active dry yeast
- 4 cups of unbleached all-purpose flour
- 2 tsp of salt
- 1/4 cup of cold butter
- 1 cup cold milk
Butter block:
- 1 and 3/4 cups of butter
- 2 tbsp unbleached all-purpose flour
Egg wash:
- 1 large egg
- 1 tbsp of milk or cream
Step 1 - Making the dough block:
- Pour the warm milk into a small bowl.
- Whisk in 1 tsp of sugar and the yeast and set aside for 10 minutes till the yeast is active and the mixture is foamy.


- In a stand mixer or a food processor mix the flour, the butter that is meant for the dough block, the salt and the remaining two tbsp of sugar.

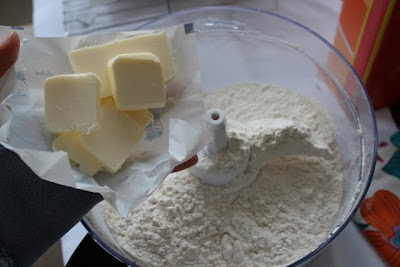


- The mixture will have a bread crumb-like texture.
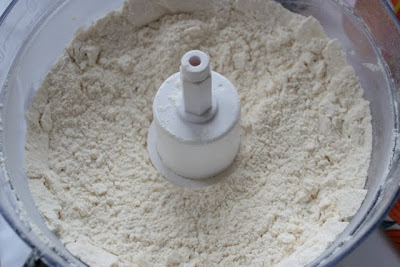
- Add this mixture to the yeast mixture and mix well.

- To this coarse combination add the 1 cup of cold milk.


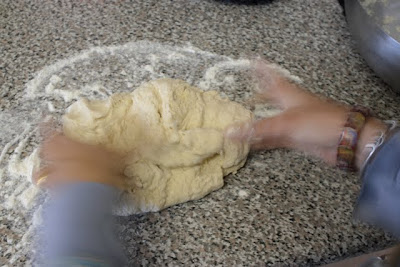
- Once the flour mixture has absorbed the liquid put the rough dough onto a floured work surface and knead gently for about 3 minutes. Do not overwork the dough.


- Wrap the dough loosely in plastic or cling film and leave it in the fridge for 30-60 minutes.


Step 2 - Make the butter block:
- Cut the butter into half inch pieces and toss the pieces in the 2 tablespoons of flour.


- Refrigerate this for 20 minutes.
- After this beat the floured butter in a stand mixer or food processor (I am not too sure about putting it in a blender as the blender is known to produce heat and that might melt the butter).
- What you are looking for after this step is a creamy mixture not liquid or choppy.

- Place this glorious lump of gold onto a plastic film, wrap it up and refrigerate while you continue onto the next step.


Step 3 - Incorporate the butter into the dough:
When I first started this step I was completely confused because it's very difficult to explain this in words and it's even tougher to get what the chef is saying by just reading the recipe.
- Dust the work surface with flour and roll the dough that has been refrigerated.

- Roll the dough into a 15 inch by 12 inch rectangle. Yes I used a scale; you can never be too precise with the French.

- Gently stretch the dough at the edges to form straight and sharp corners. You don't have to be perfect, but there's no harm in trying.

- Brush off in any flour that could be hanging around on the surface.
- Now, make sure that the smaller side is parallel to your work surface.
- Visually divide the dough into 3 equal parts cross-wise. This would mean that you would have 3 equal 5 inch sections, because your length is 15 inches. Just use the back of your knife to score the dough. DO NOT CUT IT!

- Go ahead and get the butter out of the fridge and spread the butter with your fingers on the top two sections of the dough (I know this is messy but the butter mixture is too thick to spread it properly with a knife).


- Leave 1/2 inch borders all around the two buttered sections as you do not want the butter to leak out.


Step 4 - Letter fold:
- This step is to encase the butter in the dough. Fold the empty bottom third of the dough up over the centre third of the dough.

- Then fold the top third over the centre creating what looks like a letter.

- Pinch all the seams so as to seal in the butter.


- Roll the dough 3 to 4 times gently to seal the edges.

- Wrap this package of dough and butter in plastic and refrigerate for at least an hour.


Step 5 - Book fold:
- Take out the dough from the fridge and position the short side parallel to your work surface.

- Dust the dough with flour and roll into a 20 inch by 12 inch rectangle.
- Fold the two short edges into the centre of the dough leaving a 1/4 inch crevice between them. Line up the edges precisely and square the corners as you fold.

- Rotate the dough as shown in the image and fold one side over the other like you were closing a book.


- Roll your pin over the dough gently 3 or 4 times so as to seal the seams.

- This completes your 2nd turn. Wrap in plastic and refrigerate for another hour.


Step 6 - Another letter fold:
- Yes, I know you probably want to shoot me by now but think about the flaky pastry goddess that will make its presence at the end of this ordeal; it's worth it! Chant with me!
- Remove the dough from the fridge, dust with flour and roll again into a 20 inch by 12 inch rectangle.


- Brush any flour from the surface and fold the dough in the letter fold method. Visually divide the dough into 3 equal parts cross-wise. Just use the back of your knife to score the dough. DO NOT CUT IT!

- Fold the bottom third of the dough up over the centre third of the dough.

- Then fold the top third over the centre creating what looks like a letter.

- Pinch all the seams so as to seal in the butter.


- Roll the dough 3 to 4 times gently to seal the edges.

- Wrap this package of dough and butter in plastic and refrigerate for at least 2 hours to 24 hours. I left it in the fridge overnight because it got too late to bake the croissants.


Step 7 - Cut the dough:
- Yes we finally cut the dough after all the warnings to not cut it. Take the dough out of the fridge and clear up enough space to roll the dough as this going to be big.

- Roll the dough out on a floured surface into a 26 inch by 14 inch rectangle with a 1/4 inch thickness.


- Position the rectangle so that the long edges are parallel to the edge of the work surface.
- Cut the dough horizontally into two halves.

- Now, place a scale or measuring tape parallel to the long horizontal edges and make nicks along the top edges of both halves every 4 inches. I know this sounds confusing but I'm hoping the pictures will help.

- Now place the scale or measuring tape along the bottom edge, measure 2 inches from the left and make a nick every 4 inches. This would mean that there would be a nick at the bottom edges halfway between the nicks on the top edges.

- Now, with a sharp knife cut slanting lines that go from the nick on the top edge to the nick on the bottom and then back to the next nick on the top edge, so as to create triangles.


- Complete all the triangles just like you were playing join the dots.


Step 8 - Shape the dough:
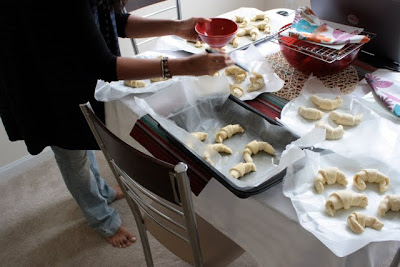
- Line the baking pan with wax paper or butter paper. Butter the paper slightly so that the croissants don't stick to it as they rise.
- Take each triangle and make a 1 inch cut at the base in the middle.

- Stretch the dough out so that it looks like the letter A.

- Roll the base up all the way till the tip of the triangle and curve it into a crescent.


- Place each croissant on the lined baking pan with a 2 inch gap.


Step 9 - Washing and baking:
- Make a wash by beating the egg and milk or cream together.
- Brush the croissants generously with the wash and leave them out in a cool room for about 2 hours.


- The croissants will rise and become almost like marshmallow in texture.

- Pop the pans into the fridge for at least 10 minutes.
- Bring them out of the fridge and wash them with the egg mixture once again before placing them in the oven at 400 degrees Fahrenheit or 200 degrees Celsius.

- Bake for 15-20 minutes until golden brown.

- Done! YAY!


Ammu, It is unbeleivable what saw just now on your blog!!! You have really taken so much pain to make perfect croissants at the very first attept!!! I could have eaten the whole at one go!!! The other day I picked up a couple of big sized croissants from Daily Bread; it was a total disaster, hard like rock and tasted nothing like croissants!!! Keep it up Ammu! Acha love you..
ReplyDeleteAmmu, You decribed the whole process on making croissants and made it very simple that anyone can follow, especially with so many pictures like a movie!!!
ReplyDeleteI loved it! Acha
Ammukutty..........
ReplyDeleteYuuuuuuuummmmmmmmmmm!!!!ya, you said right.I do'nt mind going any where in the world,to eat my favourite croissants!After seeing your blog, I promise you, that I will only eat croissants made by my little girl!
ya, I never imagined that, the little fingers which played with the dough I gave, will make my favourite croissants one day.
One doubt, can anyone go wrong in making croissats,after seeing your elaborate process that you have given in your blog?Loved every bit of it!Keep it up..........
Amazing!! I think we should address you as 'CG' - Croissant Guru! Your creative and painting skills are apparent, the way you are making cooking an art. Keep it going Sandhya and cheers to your focussed approach!
ReplyDeleteJust got introduced to your blog by your Dad. Amazingly and painfully delicious recipe for croissants from reading alone. I can imagine the fantastic taste. My wife forced me to save the recipe so she could give it a try "someday".
ReplyDeleteHi Ammu,
ReplyDeleteMust appreciate your effort and passion........thanks for the detailed procedure in making croissant. I am definitely going to try it out one day.....
Keep up the good work. You will definitely shine in fame one day
Latha Aunty ( Sagars')
I really did think u were being lazy.. but wow amazing work chef... kudos 2 u...
ReplyDeletekeep it going:)
Hi Sandhya! Welcome to Charlotte and Congratulations! - sounds like you're settling in well and turning into a chef as well! :o) This is Sujatha - we live here in Charlotte too and I'd spoken to Sandeep a couple of times before your wedding. We hope that you two can make it over some time - we live not too far away from you. Give me a call whenever you're free. And Bon Apetit!
ReplyDeleteAmmu.. Sooo proud of you for the patience and effort.. They look MOUTHwatering!! and I'm sure they tasted teh same!! :D Take care love.
ReplyDeleteammu chehci amaaaaaaaaaaaaazing!!!!!!!!! mwaaah!
ReplyDeletenandu
Thank you everyone for your, encouragement and support. It really means the world to me! Love you all so very much :)
ReplyDeleteWOW! Really amazing. I am exhausted after reading the recipe. But definitely I will try this recipe one day, at least once in my lifetime.... Hope to be in the near future. Ammu, you have real patience to do such a long elaborated recipe.....Keep it up, Ammukutty and looking forward to have more and more recipes....
ReplyDeleteTake care. Love, Valsaunty
stumbled across your blog! Must say I'm totally awed and impressed and all the superlatives! :)
ReplyDeleteYou go girl! :)